Why this matters
For the next nine months you will write code in one program more than in any other. That program is your code editor. Everything you build in this course starts as text typed into it.
A beginner who does not know the editor loses time in small ways. They hunt for the file they just made. They cannot tell why the code is a different colour. They run code they forgot to save. Each loss is only a few seconds, but you repeat them hundreds of times a week. One hour spent here removes all of them.
This lesson has three jobs. It installs the editor. It teaches you the name and purpose of every part of the window, so that later lessons can say "open the Explorer" and you know what that means. And it sets up the settings that stop the editor from getting in your way.
What an editor really is
Start with the plainest fact. A program you write is a text file. It is a file that contains only characters, with no pictures and no fonts. You could write code in Notepad, and many people did for years.
A text file is a long row of characters. Each character is stored as a number, and a program that shows the file turns those numbers back into letters. You can see this for yourself. The program below takes the three-character text Hi followed by a line break, and prints the number stored for each character. Press Run.
The output is:
"H" 72
"i" 105
"\n" 10
length: 3
Look at the third line. The line break is a character too. It is stored as the number 10, and \n is how code writes it. When you press Enter in an editor you add that character to the file. Nothing is hidden: the file is exactly the characters you see, plus invisible ones like this.
A code editor is a text editor with extra help for people who write programs. The help comes in four kinds.
- Syntax highlighting. The editor colours different parts of the code. Words with a special meaning get one colour, text in quotes another, numbers a third. The colours do not change the program. They make the structure visible, the way a highlighter pen helps you read a textbook.
- Completion. While you type, the editor suggests what you probably mean, such as the rest of a long name.
- Error marking. The editor draws a wavy red line under code that is almost certainly wrong, before you run anything.
- Project tools. Search across many files, a file tree, version control and a built-in terminal.
An analogy helps. Writing code in Notepad is like cooking on a bare table with a knife. A code editor is a kitchen: the same knife, but also a stove, a sink and labelled shelves within reach. The food is still yours. The kitchen only removes the walking around.
Editor, IDE and Visual Studio
You will hear three words that sound alike.
- A code editor is light and fast. It edits text and adds a modest set of helpers. VS Code is a code editor.
- An IDE, short for integrated development environment, is a heavier tool built for one language or platform. It bundles the editor, a compiler, a debugger and project templates. Large Java and C# projects often use an IDE.
- Visual Studio is a Microsoft IDE. It shares a word with VS Code and nothing else. They are different programs with different installers.
Visual Studio Code, shortened to VS Code, sits in between. Out of the box it is an editor. Add extensions, which are small add-on programs, and it can behave like an IDE for almost any language. That flexibility is why it is the most widely used editor among developers in surveys, and why this course uses it.
Two more facts help. VS Code is free. It is built with web technology and runs on Windows, macOS and Linux, so the screen you see on your machine matches the screens in tutorials, with the same shortcuts apart from one swap of keys covered below. Its core is open source, which means anyone can read how it works and many people have helped improve it.
Install it
Follow the section for your system. Download only from the official site, code.visualstudio.com. The downloads page picks your system for you.
Windows
- Download the User Installer for Windows. It installs without needing administrator rights.
- Run it and accept the licence.
- On the "Select Additional Tasks" screen, tick Add "Open with Code" action to Windows Explorer file context menu, tick the same for the directory context menu, and make sure Add to PATH is ticked. The PATH option is what lets you type
code .in a terminal later. - Finish and start VS Code.
If you prefer the terminal, the Windows package manager can do it in one line:
winget install Microsoft.VisualStudioCodemacOS
- Download the zip file for macOS from the site.
- Open the zip. You get an app called Visual Studio Code.
- Drag it into your Applications folder.
- Open it from Applications. macOS may warn that it was downloaded from the internet. Choose Open.
- To use
code .in the terminal, open the command palette (Cmd+Shift+P), typeshell command, and choose Shell Command: Install 'code' command in PATH. You only do this once.
Linux
On Ubuntu or Debian you can download the .deb file and install it. Replace the file name with the one you downloaded.
sudo apt install ./code_1.0.0_amd64.debAnother route that works on many distributions is the Snap package:
sudo snap install code --classicThe installer adds code to your PATH on its own.
Check that it worked
Open a terminal (the Terminal module showed you how) and type:
code --versionYou see three lines: a version number, a long hexadecimal commit code, and your processor type. The numbers change every month because VS Code releases a new version about monthly. The exact numbers do not matter. What matters is that you got three lines and no error.
If you are using Windows with WSL, which is Linux running inside Windows, install VS Code on Windows as above, never inside Linux. Then install the extension called WSL (next lesson). After that, typing code . in your Linux terminal opens a VS Code window that edits your Linux files, and the bottom-left corner of the window shows WSL: Ubuntu or the name of your distribution. That corner is how you can tell which world the window is working in.
First launch
When VS Code opens you see a Welcome page. It offers a colour theme, a walkthrough and recent folders. You can close it. It never blocks you.
Pick a colour theme now, because your eyes will be on this screen for hours. Press Ctrl+K then Ctrl+T (hold Ctrl, press K, release, hold Ctrl again, press T). That is a chord: two key presses in a row make one shortcut. A list of themes appears and the editor previews each as you move through the list. Dark themes reduce glare in a dim room. Light themes read well in daylight. Neither is better for coding. Choose what keeps your eyes comfortable.
Open a folder, not a file
A real project is not one file. It is a folder that holds many files, and a program needs to know about all of them. For example, app.js may use code from helpers.js.
VS Code can open a single file, but the useful way to work is to open the whole folder. Choose File, Open Folder (on macOS, File, Open), pick your course folder, and click Select Folder.
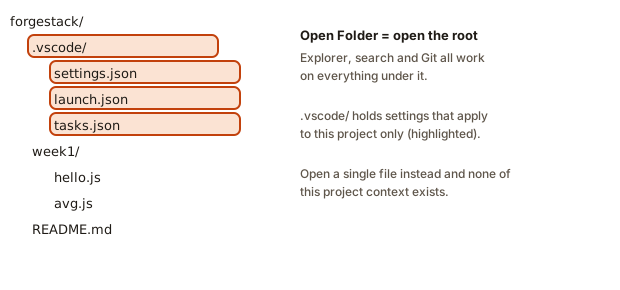 A project folder as VS Code shows it: a root folder with a hidden .vscode folder of project settings, a week1 folder and a README file
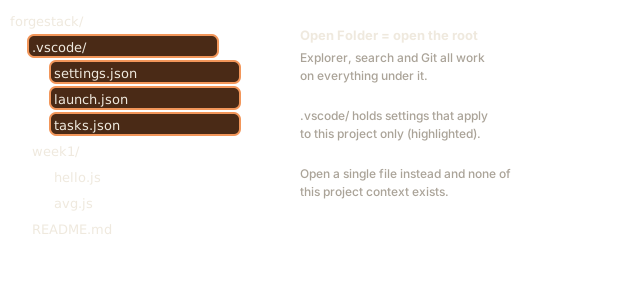
The top folder you open is called the root of the workspace. A workspace is simply "the folder VS Code currently treats as the project". The Explorer, search, source control and the terminal all start from that root.
The first time you open a new folder, VS Code asks:
Do you trust the authors of the files in this folder?This is Workspace Trust. Code in a project can run automatically. Some extensions and some project settings can start programs when you open the folder. If the folder is yours, or you wrote it, choose Yes, I trust the authors. If it came from a stranger, for example a zip from an email, choose No, I don't trust the authors. VS Code then opens in Restricted Mode, which switches off the features that could run code, and you can still read the files safely.
You can also open a folder from a terminal. Move into the folder first, then type:
code .The dot . means "the folder I am in right now". Typing code week1 would open the folder called week1 inside the current folder, and code hello.js would open just that file.
A tour of the window
Here is the window in five regions. Learn these names. Every later lesson and every online tutorial uses them.
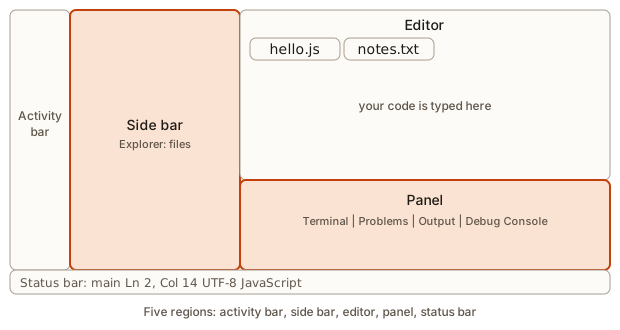 The VS Code window divided into the activity bar, side bar, editor, panel and status bar
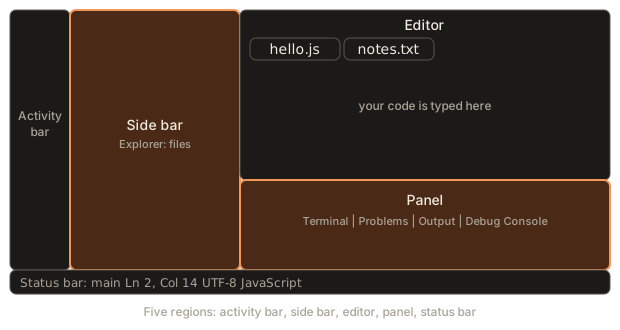
The activity bar
The narrow strip of icons on the far left is the activity bar. Each icon switches what the side bar shows. From the top:
| Icon view | Shortcut | What it is for |
|---|---|---|
| Explorer | Ctrl+Shift+E | The file tree of your project |
| Search | Ctrl+Shift+F | Find text across every file |
| Source Control | Ctrl+Shift+G | Git changes (you used Git in the previous module) |
| Run and Debug | Ctrl+Shift+D | Start the debugger (the last lesson of this module) |
| Extensions | Ctrl+Shift+X | Install add-ons |
At the bottom of the strip are two more icons: an Accounts icon for signing in, and a gear called Manage, which opens settings, the command palette and the theme picker. On macOS, replace Ctrl with Cmd in every shortcut in this module.
The side bar and the Explorer
The panel next to the activity bar is the side bar. It shows whatever view you picked. The one you will use most is the Explorer, a tree of your project's folders and files. Click a folder to open or close it. Click a file to open it.
At the top of the Explorer are four small buttons: New File, New Folder, Refresh and Collapse Folders. Right-click any file or folder for a menu with Rename, Delete, Copy Path and more. Pressing F2 on a selected file renames it.
If you need more room, hide the side bar with Ctrl+B. Press it again to bring it back.
The editor and its tabs
The large area in the middle is the editor. Each open file has a tab across the top. Some details that confuse beginners:
- A tab with its name in italics is a preview tab. When you single-click a file in the Explorer, VS Code opens it in a preview tab that is replaced when you click another file. Double-click the file or the tab, or start typing in it, and the tab becomes permanent.
- A dot where the close button would be means the file has unsaved changes.
- You can drag a tab to the side of the editor to split the view and see two files at once.
Ctrl+\splits the current editor. Ctrl+Wcloses the current tab.Ctrl+Tabcycles through open tabs.
Left of the code is a narrow column with line numbers. This column is called the gutter. Clicking in it sets a breakpoint, which you will use in the debugging lesson. Along the right edge is the minimap, a tiny picture of the whole file you can drag to jump around. Above the code is the breadcrumb trail showing the file path and the function you are inside. You can switch the minimap off if it distracts you.
The panel
The strip along the bottom is the panel. It has tabs:
- Problems lists every error and warning VS Code found in your files, with the file and line.
- Output shows messages from extensions and tools.
- Debug Console is where the debugger prints and where you can type expressions.
- Terminal is a real terminal window inside the editor. You open it with
Ctrl+`(the backtick key, usually above Tab). Next lesson covers it fully.
Toggle the panel with Ctrl+J.
The status bar
The thin bar at the very bottom is the status bar. It is easy to ignore and full of useful facts. From left to right you will see, among other things:
- The Git branch name, for example
main. - The count of errors and warnings.
- Ln 2, Col 14: your cursor position.
Lnis the line number andColis the column, the count of characters from the line's start. - Spaces: 2 or Tab Size: 4: how the Tab key indents.
- UTF-8: the text encoding of the file, which is the system for turning numbers into characters. UTF-8 is the modern standard and you almost never change it.
- LF or CRLF: the line-ending style (more below).
- JavaScript: the language mode. VS Code decides how to colour and check the file from this. Click it to change it.
You can test how the position counting works with a small program. It reads text you type into the Input box, then reports the number of lines and which line is the longest. In the Input box below the code, type these two lines, then press Run:
const a = 1;
console.log(a);With that input the output is:
lines: 2
longest is line 2 with 15 characters
cursor at end of it would show Col 16
The column is one more than the number of characters because the cursor sits after the last character. Column 1 is the very start of a line, before the first character. This explains the first number you will meet in many error messages: when a tool says file.js:2:13, it means line 2, column 13.
Create your first project
You now build a small working folder that the rest of the module reuses.
- Open your
forgestackfolder with Open Folder (create it first in your file manager or withmkdir forgestackif it does not exist). - In the Explorer, click the New Folder icon and type
week1, then press Enter. - Right-click
week1, choose New File, and typehello.js. - The file opens in the editor. Type this:
Save with Ctrl+S (Cmd+S on macOS). The dot on the tab disappears. Press Run on the box above to see what the program prints:
Hello, Anisha!The .js in the file name is the file extension: the letters after the last dot. It tells your computer and VS Code what kind of file this is. With .js the editor treats the text as JavaScript and colours it that way. If you named the file hello.txt, the code would appear as plain black text because VS Code would treat it as ordinary text.
The same idea works for any language. Save the following as hello.py and VS Code switches to Python colouring on its own:
Hello, Anisha!Notice the status bar's language mode flip from JavaScript to Python when you click between the two tabs. The extension chose the mode.
How file paths and extensions fit together
A path is the address of a file: the folders you pass through to reach it. forgestack/week1/hello.js means "the folder forgestack, inside it week1, inside it the file hello.js". A program can split a path into pieces. The next block does it with a built-in tool called path.
forgestack/week1
hello.js
.js
forgestack/week2/notes.js
dirname is the folder part, basename is the file name, and extname is the extension. Editors do this constantly: your right-click menu "Copy Relative Path" gives you a path like the first line, and the extension decides the language mode.
Here is a second small program that groups a list of files by their extension, the way an editor does when it picks a mode for each:
{ '.js': 2, '.txt': 1, '.md': 1, '.py': 1 }Line endings, tabs and spaces
Two invisible choices hide in every text file.
Line endings. Windows traditionally ends a line with two characters, a carriage return and a line feed, written CRLF. macOS and Linux use one, LF. The status bar shows which your file uses. Mixed endings in one project cause strange diffs in Git. A simple rule: leave it alone unless a team tells you otherwise, and know that Git can convert endings for you. If your teammates are on Linux and you are on Windows, a setting files.eol set to "\n" makes new files use LF.
Tabs and spaces. To indent a line, you can insert a Tab character or a fixed number of space characters. Both look identical on screen. The status bar shows Spaces: 2 or Tab Size: 4. JavaScript projects mostly use two spaces. Python projects use four. Pick the style of the project you are in, and the editor will keep to it. VS Code can guess the style by reading the file when editor.detectIndentation is on, which is the default.
Settings
Settings control how the editor behaves. Open them with Ctrl+, (Cmd+, on macOS). There is a search box at the top. Type a word and the matching settings appear.
Three layers
Settings live in layers, and a more specific layer beats a general one.
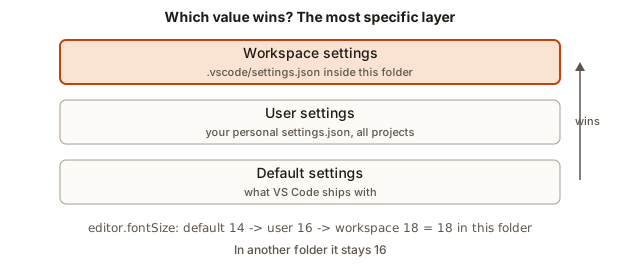 Three layers of settings: default, user and workspace, where the workspace layer wins over the user layer, which wins over the default
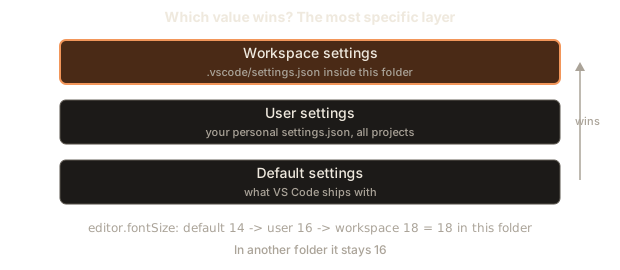
- Default settings are what VS Code ships with.
- User settings are yours, and apply in every folder you open.
- Workspace settings belong to one folder and are stored inside it, in
.vscode/settings.json. They apply only there, and they override your user settings.
The Settings page has two tabs, User and Workspace, so you can choose the layer when you change something. Workspace settings are how a team shares rules: the file is part of the project, so everyone who opens the folder gets the same behaviour.
The settings file
Every toggle on the Settings page is stored in a plain text file in a format called JSON. You can edit it directly. Open the command palette (Ctrl+Shift+P) and run Preferences: Open User Settings (JSON). The file looks like this:
{
  "editor.fontSize": 16,
  "files.autoSave": "afterDelay",
  "editor.wordWrap": "on"
}
JSON is a way to write data as text. Names are in double quotes, each followed by a colon and a value, and entries are separated by commas. This next program reads such text and prints each setting, so you see how a tool treats the file:
editor.fontSize = 16
files.autoSave = afterDelay
editor.wordWrap = on
number of settings: 3
VS Code's own settings file is slightly looser than strict JSON: it allows comments that start with // and a comma after the last entry. The program above would reject those, which is why the sample leaves them out.
Settings worth changing today
Search for each name in the settings box.
| Setting name | Suggested value | Why |
|---|---|---|
files.autoSave | afterDelay | Saves after a short pause, so you cannot forget. Other choices: off, onFocusChange, onWindowChange |
editor.fontSize | 15 to 18 | Bigger text is kinder to your eyes |
editor.wordWrap | on | Long lines wrap to the window instead of running off the edge |
editor.formatOnSave | true | Tidies the layout of your code each time you save (works best after the extension in the next lesson) |
editor.tabSize | 2 for JavaScript | How wide one indent step is |
files.trimTrailingWhitespace | true | Removes invisible spaces at the ends of lines |
files.insertFinalNewline | true | Ends every file with a line break, a Unix convention that keeps Git diffs clean |
editor.minimap.enabled | false if you dislike it | Frees screen space |
You can also change the zoom of the whole window with Ctrl+= and Ctrl+-. The font size setting changes only the text of the editor, while zoom scales buttons and menus too.
What formatting does
Formatting changes the layout of code, not its meaning. A formatter is a tool that rewrites spacing, line breaks and quotes into one agreed style. Run the next block. It holds the same function twice, once squashed and once neat:
5
5
Both versions print 5. The formatter turns the first shape into the second. You will turn the format feature on properly in the next lesson, after you install the extension that does it.
What happens inside when you open and edit a file
When you open hello.js, VS Code asks your operating system to read the bytes of the file from disk. It decodes them as UTF-8 text and shows them in the editor. What you see on screen is a copy held in memory.
When you type, you change the copy in memory only. That is why the tab shows a dot. The file on disk stays as it was. Saving writes the in-memory copy back to disk and removes the dot. Any other program that reads the file, such as Node or Git, reads the disk version. This single fact explains most "I changed my code but nothing changed" problems, and the run lesson returns to it.
Auto Save removes the gap by saving for you after a pause of one second, or when you click away from the window, depending on the mode you choose.
Common mistakes
Here are the real problems beginners meet in this first hour, with their exact messages.
The command code is not found. In a Windows command prompt you see:
'code' is not recognized as an internal or external command,
operable program or batch file.
In bash on Linux you see bash: code: command not found, and in zsh on macOS zsh: command not found: code. All three mean the same thing: the terminal cannot find VS Code on its PATH. On Windows, run the installer again and tick Add to PATH, then open a new terminal, because terminals read the PATH only when they start. On macOS, run the command Shell Command: Install 'code' command in PATH from the palette.
Opening a single file instead of the folder. If the Explorer is empty or says "You have not yet opened a folder", you opened a file. Use File, Open Folder.
Opening the wrong level of folder. If you open Documents instead of forgestack, search scans everything in Documents and the Source Control view looks for a Git project in the wrong place. Close the folder with File, Close Folder and open the right one. A good habit is to glance at the folder name at the top of the Explorer.
A file that is secretly hello.js.txt. Windows hides known file extensions by default. If you create a file in the file manager, it can end up named hello.js.txt, and VS Code shows plain text with no colours. In the file manager's View menu, turn on file name extensions. Creating files inside the VS Code Explorer avoids the trap, because the Explorer shows the true name.
Forgetting to save. The dot on the tab is the warning. You will run old code and wonder why nothing changed. Turn on Auto Save.
A file that will not open as text. If you double-click an image or a compiled file you may see:
The file is not displayed in the text editor because it is either binary or uses an unsupported text encoding.This is normal. A binary file is not text. Do not try to edit it here.
Confusing VS Code with Visual Studio. If you downloaded something that is several gigabytes, you got Visual Studio. VS Code is a much smaller download.
Changing a setting in the wrong layer. If a setting works in one folder and not another, a workspace setting is overriding your user setting. Check the Workspace tab of the Settings page or open .vscode/settings.json.
A debugging walkthrough: "my file has no colours"
A common first-week puzzle. You type this into a new file and everything is white:
const name = "Anisha";
console.log(name);
Work through it like a detective.
- Look at the status bar. It says Plain Text. That is the cause: VS Code thinks this is ordinary text, so it colours nothing.
- Look at the tab name. It says
Untitled-1. You never saved the file with a name, so there is no extension to read. - Fix it. Press
Ctrl+Sand save ashello.js. The language mode flips to JavaScript and the colours appear. - Another route. If a file already has the wrong mode, click the language name in the status bar, and pick JavaScript from the list. This changes the mode for the current session. Renaming the file is the real fix.
The method is the same one the last lesson teaches: observe the facts first (status bar, tab name), then reason from them.
Interview and real-world use
Nobody is hired for knowing VS Code. But the editor appears everywhere in working life.
- On a team, the
.vscodefolder is committed to Git. A new developer opens the project and the settings, recommended extensions and debug setups are already there. - Live coding interviews often happen in a browser editor. People who know basic editing moves (select a line, move it, find text) stay calm, because the tool is not what they are thinking about.
- Many senior developers share their settings file with a friend as a gift. Settings Sync, started from the Accounts icon, can carry your settings, shortcuts and extension list to a new computer after you sign in with a GitHub or Microsoft account.
Practice
- Install VS Code. In a terminal, run
code --versionand write down the first line. - Open the folder
forgestack. Createweek1/hello.jswith the program from this lesson, save it, and read the status bar: write down the language mode and the line and column of your cursor at the end of line 2. - Switch your colour theme with
Ctrl+KthenCtrl+T. Keep one that is comfortable for you. - Turn on Auto Save by finding the setting
files.autoSaveand choosingafterDelay. Edit a file, wait two seconds, and confirm the tab dot disappears without pressing save. - Open the file
.vscode/settings.jsonfor your workspace by running the palette command Preferences: Open Workspace Settings (JSON). Add"editor.fontSize": 18. Check the editor font changes only in this folder. - Put the cursor on line 2 of
hello.js. Using only the status bar, find its line and column. Then pressEndand say how the column changed and why. - Create
week1/hello.pyand print your name in Python. Watch the language mode change in the status bar. - Open
Documents(or any big folder) as a workspace, run a project-wide search withCtrl+Shift+Ffor the wordthe, and note how slow or noisy it is. Close that folder and reopenforgestack. Write two sentences on why folder level matters. - In a file manager, make a file called
bad.js.txtwith some JavaScript. Open it in VS Code and explain, using the status bar, why there are no colours. Fix it by renaming. - A teammate says "my editor shows spaces 4 but yours shows 2, and my pull request is full of changes in lines I did not touch." Explain what is happening and name one setting and one file that would help your team agree.
Solution
-
The output has three lines, for example a version like
1.95.0, a long commit code, andx64. The first line is the version. Yours will differ because VS Code updates monthly. -
The language mode reads JavaScript. After the line
console.log("Hello, " + name + "!");the cursor at the end of line 2 showsLn 2, Col 37, because the line has 36 characters. Count the characters in your own line: column is the length plus one. -
Any theme is correct. The point is learning the chord
Ctrl+KthenCtrl+T. -
After setting
afterDelay, edit a file and wait. The dot on the tab disappears after about one second without a manual save. -
The Workspace JSON file is
.vscode/settings.jsoninside the folder. It now contains"editor.fontSize": 18and VS Code creates the.vscodefolder if needed. Another folder keeps your user font size. -
The status bar shows
Ln 2, Col 1at the start of line 2. AfterEndit shows the length of the line plus one. The column counts characters before the cursor, plus one. -
print("your name")inhello.py. The status bar switches to Python because of the.pyextension. -
A huge folder makes search slow and returns matches from unrelated files, and Git or the terminal would start in the wrong place. The workspace root decides the scope of search, Source Control and the terminal.
-
The status bar shows Plain Text because the real extension is
.txt. Rename the file tobad.jsinside the Explorer (pressF2) and the colours appear. Turn on "File name extensions" in the Windows file manager to avoid the trap. -
The two editors indent differently and the formatter or detect-indentation changed the spacing of untouched lines. Agree on one setting,
editor.tabSize(witheditor.insertSpaces), and put it in the project's.vscode/settings.jsonso that it is committed and shared. A formatter configuration file in the repository goes further, and the next lesson covers it.
What you now know
- A code file is plain text, and the editor adds colour, completion, error marks and project tools.
- VS Code is a free editor, different from Visual Studio, and you install it from the official site and check it with
code --version. - You open a folder as the workspace root, and you decide whether to trust it.
- The window has an activity bar, side bar, editor, panel and status bar, and each has a job.
- The status bar tells you the cursor line and column, indentation, encoding, line endings and language mode.
- Settings come in default, user and workspace layers and are stored as JSON.
- Edits live in memory until you save, so turn on Auto Save.