Why this matters
So far everything lived on your own computer. Real projects are shared. GitHub is where most code is shared, reviewed and discussed, and it is also your public portfolio: employers read your profile. This lesson connects your local repository to a copy on GitHub, teaches the commands that move commits between the two, and then teaches the workflow professionals use all day: branch, push, pull request, review, merge.
You will need a free GitHub account. Create one at github.com if you do not have it, and pick a username you would be happy to put on a CV.
The idea: one project, several copies
Git is distributed (lesson 1), so there is no single "the" repository. There are several copies that can exchange commits. A copy that lives somewhere else, usually on a server, is called a remote. GitHub hosts the remote copies.
An everyday analogy: a shared family photo album on the cloud. Each person also keeps photos on their own phone. You upload ("push") new photos to the cloud, and download ("pull") what others added. The cloud copy is only convenient because everyone agrees to treat it as the shared one.
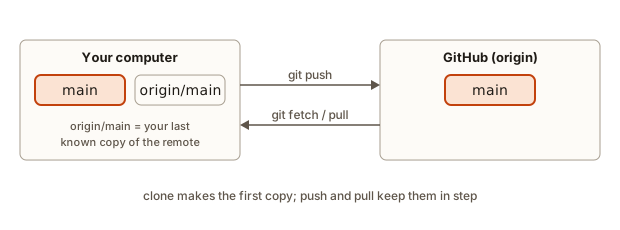 Local repository and remote repository connected by push and fetch or pull
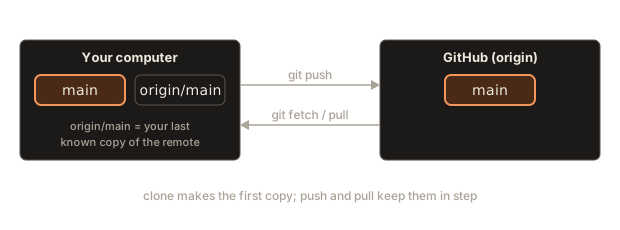
Two words to fix in your mind:
- Remote: a named link to another copy of the repository. The default name is origin, meaning "the place I got this from or send this to".
- Remote-tracking branch: your computer's memory of where a remote branch was the last time you talked to it. It is named like
origin/main. It is not the live GitHub copy. It is a note that only updates when you fetch, pull or push.
Create a repository on GitHub
- Sign in on GitHub and choose the New repository option (a plus sign near the top of the page).
- Type a name, for example
cafe-site. Short, lower case, with hyphens. - Choose Public (anyone can see it) or Private (only you and people you invite).
- If you already have a local project to upload, leave "Add a README", ".gitignore" and "License" unticked. An empty remote is simplest to connect to. If you tick them, GitHub creates a first commit that your local repo does not have, and your first push will be rejected.
- Press Create repository. GitHub shows a page with the repository's address and instructions.
The address (the URL) comes in two forms:
- HTTPS:
https://github.com/yourname/cafe-site.git - SSH:
git@github.com:yourname/cafe-site.git
The difference is how you prove who you are, covered next. Here is a toy to tell the forms apart, which also shows that a plain folder path can be a remote too:
HTTPS      repo=cafe-site
SSH        repo=cafe-site
local path repo=cafe-site
Proving who you are
GitHub must know that a push really comes from you. There are three common ways. Pick one.
Option A: GitHub CLI (easiest)
GitHub offers a free command-line tool called gh. After installing it from cli.github.com (or with your package manager), run:
gh auth loginIt asks a few questions (choose GitHub.com, HTTPS, and log in through the browser). Afterwards Git can push over HTTPS without further prompts.
Option B: HTTPS with a token
GitHub no longer accepts your account password for Git over HTTPS. If you use HTTPS without gh, Git asks for a username and then a personal access token: a long random string that acts like a password with limited powers. You create it in your GitHub settings (Settings, Developer settings, Personal access tokens). Git's credential helper (included with Git for Windows and macOS) stores it, so you type it only once. Treat a token like a password: never commit it, never paste it into a chat.
Option C: SSH keys
SSH uses a pair of files: a private key that stays secret on your computer, and a public key you give to GitHub. Anyone may see the public key; only the private key proves identity. An analogy: the public key is a padlock you hand out to everyone, and the private key is the only key that opens it.
Create a pair:
ssh-keygen -t ed25519 -C "asha@example.com"Press Enter to accept the default file location. You may set a passphrase (extra password for the key file) or leave it empty. It prints something like:
Generating public/private ed25519 key pair.
Your identification has been saved in /home/asha/.ssh/id_ed25519
Your public key has been saved in /home/asha/.ssh/id_ed25519.pub
Two files appear in the .ssh folder in your home directory: id_ed25519 (private, never share) and id_ed25519.pub (public). Print the public one and copy the whole line, which begins ssh-ed25519:
cat ~/.ssh/id_ed25519.pubOn GitHub, go to Settings, then "SSH and GPG keys", press New SSH key, and paste it. Test the connection:
ssh -T git@github.comYou should see a greeting that includes your username and tells you GitHub does not provide shell access. That is success: you are authenticated, and GitHub deliberately gives no terminal. Then use SSH-style URLs when connecting.
Whichever option you choose, the commands below are identical.
Connect and push for the first time
Inside your local project (with at least one commit), tell Git about the remote:
git remote add origin https://github.com/yourname/cafe-site.git
git remote -vorigin https://github.com/yourname/cafe-site.git (fetch)
origin https://github.com/yourname/cafe-site.git (push)git remote add origin <url> creates a remote named origin. -v (verbose) lists remotes: one address for fetching, one for pushing. They are usually the same.
Now upload the main branch:
git push -u origin mainTo https://github.com/yourname/cafe-site.git
* [new branch] main -> main
branch 'main' set up to track 'origin/main'.Break the command into pieces:
git pushuploads commits.originis where to send them.mainis which branch to send.-u(short for--set-upstream) tells Git to remember that your localmaingoes withorigin/main. After this first time, plaingit pushandgit pullare enough.
Reload the repository page on GitHub. Your files and commit history appear. You have a backup and a shareable link.
(The output above came from a practice remote on the same computer, since GitHub's page cannot be called from a lesson. The shape of the messages is the same.)
What does git branch -vv tell me?
git branch -vv* main 338a2f6 [origin/main] AThe part in square brackets is the upstream: this local branch tracks origin/main. If you are ahead or behind, it says so, such as [origin/main: ahead 1].
Cloning someone else's repository
To copy an existing repository, even one that is yours on another computer, use clone:
git clone https://github.com/yourname/cafe-site.gitCloning into 'cafe-site'...
done.(Real output also prints counts of objects received.) clone does four things in one go: it makes a new folder named after the repository, downloads the whole history, remembers the source as the remote origin, and checks out the default branch. You can start working immediately:
cd cafe-site
git log --oneline | head -3
git branch -a0d2c37f Merge fix-title
441e469 Add Bakery to title
7005a53 Rename title to The Corner Cafe
* main
remotes/origin/HEAD -> origin/main
remotes/origin/fix-title
remotes/origin/maingit branch -a lists local branches plus the remote-tracking branches (those starting with remotes/origin/). Notice there is only one local branch (main), though the remote has two. You see the other only as origin/fix-title until you switch to it, at which point Git creates a local branch for you.
Getting changes: fetch and pull
Your teammate pushes a commit to GitHub. Your computer does not know. To learn about it, you ask the remote.
git fetch downloads new commits and updates your remote-tracking branches (origin/main), but does not touch your own branches or files. It is always safe, like looking at the post without opening it.
git pull is git fetch followed by merging the fetched commits into your current branch. It changes your files.
git fetch
git statusOn branch main
Your branch is behind 'origin/main' by 1 commit, and can be fast-forwarded.(The exact line depends on the situation. It might say "ahead", "behind" or "have diverged".) When you are only behind, git pull fast-forwards. When your teammate and you both committed, the histories have diverged and git pull needs to combine them. That leads to the most common error beginners hit.
The rejected push and how to fix it
Setup: Asha and Ravi both cloned the project. Ravi commits and pushes first. Then Asha makes her own commit and pushes:
git pushTo https://github.com/yourname/cafe-site.git
! [rejected] main -> main (fetch first)
error: failed to push some refs to 'https://github.com/yourname/cafe-site.git'
hint: Updates were rejected because the remote contains work that you do not
hint: have locally. This is usually caused by another repository pushing to
hint: the same ref. If you want to integrate the remote changes, use
hint: 'git pull' before pushing again.
hint: See the 'Note about fast-forwards' in 'git push --help' for details.Read it slowly. ! [rejected] ... (fetch first) says Git refused. The hint explains: the remote has commits you lack. If Git accepted your push, Ravi's commit would be thrown away. So Git makes you integrate first. A toy shows the rule:
Ravi pushed -> ['A', 'B', 'D']
Asha REJECTED: remote has D which Asha does not have
Asha pushed -> ['A', 'B', 'C', 'D', 'M']
The fix is the same in real life: pull, then push.
git pullOn a recent Git, if the histories diverged and you have never chosen a strategy, Git stops with a message. The key lines are:
hint: You have divergent branches and need to specify how to reconcile them.
...
fatal: Need to specify how to reconcile divergent branches.
The hint lists the three choices. Pick the straightforward one for now, a merge:
git pull --no-rebaseMerge made by the 'ort' strategy.
team.txt | 1 +
1 file changed, 1 insertion(+)
create mode 100644 team.txtGit opens your editor for the merge commit message (accept it) and combines the two lines of work, exactly like the three-way merge from lesson 4. If you and your teammate changed the same lines, you get a conflict, and you resolve it the same way: edit, git add, git commit. Then push:
git push 43f0960..732c33a main -> mainThe numbers say the remote main moved from 43f0960 to 732c33a. To make merging the default permanently, set it once with git config --global pull.rebase false.
Another strategy is rebase: git pull --rebase replays your commits on top of the newest remote commit, giving a straight history without a merge commit:
* 0332266 Add c
* 0474309 Add d
* 51cc15f Add a
Rebase rewrites your local commits (their IDs change), so only use it on commits you have not shared yet. Many teams prefer it, many prefer merging. Use whichever your team uses. Until you know, merge.
Never answer a rejected push with git push --force. Force makes the remote match your copy exactly and deletes Ravi's commit. On shared branches it is the fastest way to lose a teammate's work and your reputation.
The pull request workflow
Most teams do not push directly to main. They use a pull request (PR): a page on GitHub that says "I made these changes on this branch, please review them and merge them into that branch". The name is slightly backwards. You ask the maintainer to "pull" your work in.
A pull request gives you a place for discussion on exact lines, automatic checks (tests run on your branch), an approval step, and a permanent record of why a change was made.
Here is the complete loop, which you will repeat every working day.
- Start from an up-to-date
main.
git switch main
git pull- Make a branch for one piece of work.
git switch -c fix-footer-link- Edit, then commit in small steps.
git add index.html
git commit -m "Fix broken footer link"- Push the branch. The first time, Git needs
-u:
git push -u origin fix-footer-linkOn a typical GitHub setup the output ends with a line giving a link to open a pull request. Alternatively, GitHub shows a yellow banner with a Compare and pull request button on the repository page.
-
Open the pull request. Choose the base branch (where the change will land, normally
main) and the compare branch (yours). Write a title and a description: what changed, why, how to check it, and whether it is related to an issue. If the PR fixes issue number 12, writeCloses #12in the description and GitHub closes the issue automatically when the PR merges. -
Wait for review and checks. A teammate reads the "Files changed" tab, comments on lines, and approves or asks for changes. Automated checks, if configured, show a green tick or a red cross.
-
Respond. Make the requested changes on the same branch, commit and push. The pull request updates itself: no need to open a new one.
git add index.html
git commit -m "Use relative path for footer link"
git push- Merge. When approved, someone presses Merge pull request (you, if you have permission, or the maintainer). GitHub offers three styles:
| Style | What it does to history |
|---|---|
| Merge commit | Adds a merge commit; keeps all your commits |
| Squash and merge | Combines all your commits into one new commit on main |
| Rebase and merge | Replays your commits one by one on top of main, no merge commit |
Squash is popular because a messy branch (with commits like "fix typo", "try again") turns into one tidy commit.
- Clean up. Delete the branch on GitHub (there is a button), then update locally:
git switch main
git pull
git branch -d fix-footer-link
If you used squash merge, git branch -d may complain that the branch is "not fully merged", because the squashed commit has a different ID from your branch commits. In that case it is safe to use git branch -D fix-footer-link once you have confirmed that the PR was merged.
To delete the remote branch from the command line instead:
git push origin --delete fix-footer-link - [deleted] fix-footer-linkWriting a good pull request
A reviewer is a busy person doing you a favour. Make it easy.
- Small. A PR with 50 changed lines gets reviewed in minutes. A PR with 2,000 lines is skimmed or ignored. One purpose per PR.
- A clear title in the same style as a commit message: "Fix broken footer link".
- A description that says what, why, and how to test. Include a screenshot for visual changes.
- No unrelated changes. Do not reformat other files in the same PR.
- Reply to every comment, even if only "Done". Do not take review personally: it is about the code.
A template for a description:
What: Fixes the footer link to the menu page.
Why: The link used an absolute path and returned a 404.
How to check: Open index.html, click "Menu" in the footer.
Closes #12
Reviewing someone else's pull request
Reviewing is a skill too. Open the Files changed tab. Click the plus sign beside a line to comment on it. When done, choose Approve, Comment or Request changes. Good review comments are specific, kind, and explain the reason: "This loop reads the file every time; could we read it once before the loop?" rather than "bad".
Contributing to a project you do not own: fork and pull request
You cannot push to somebody else's repository. For open-source projects you use a fork: your own copy of their repository on GitHub, which you do own.
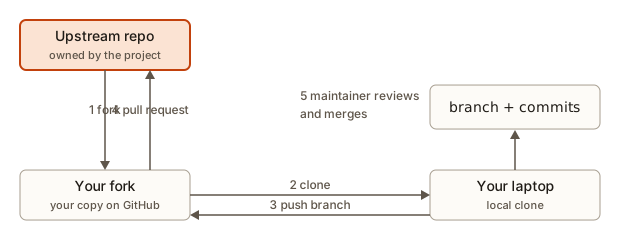 Fork, clone, branch, push and open a pull request back to the upstream repository
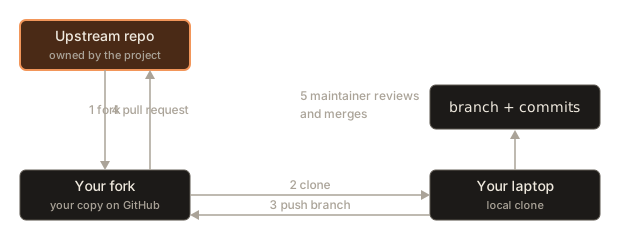
The steps:
- On the project's GitHub page, press Fork. You now have
yourname/project. - Clone your fork:
git clone https://github.com/yourname/project.git. - Create a branch:
git switch -c fix-typo-in-readme. - Make the change, commit, and push the branch to your fork with
git push -u origin fix-typo-in-readme. - On GitHub, press Compare and pull request. The base is the original project, the compare side is your fork's branch.
- The maintainers review. They may ask for changes; push more commits to the same branch.
- If accepted, they merge it. Your contribution is now in the original project, and it appears on your profile.
Over time the original project moves ahead of your fork. To stay in sync, add the original as a second remote, conventionally named upstream:
git remote add upstream https://github.com/original-owner/project.git
git fetch upstream
git switch main
git merge upstream/main
Many first-time contributors begin with a documentation fix. It is a safe way to learn the process in public. Look for issues labelled "good first issue" and read the project's CONTRIBUTING.md file, which explains its rules.
How real teams run this workflow
The loop above is the beginner version. Professional teams add a few safeguards, and you will meet all of them in your first job.
Branch protection. The maintainers switch on rules for main in the repository settings: pushes straight to main are blocked, at least one person must approve a pull request, and the automated checks must pass before the Merge button becomes available. This protects the shared line from untested work. If you ever see "protected branch hook declined", it simply means: open a pull request instead.
Automated checks. When you push to a branch with an open PR, a service (GitHub Actions is GitHub's own) can run the project's tests and style checks. A green tick means they passed, and a red cross means something failed. Click the cross to read the log, fix the code, commit and push again. The checks re-run on their own. You will learn more about this in later modules, when you write tests.
Code owners and reviewers. A file named CODEOWNERS can say that changes to a folder must be approved by a specific person or team. GitHub then requests their review automatically.
Issues. An issue is a page for a bug report, a task or a question. Issues have numbers, such as #12. A pull request can mention an issue, and writing Closes #12 or Fixes #12 in the description links the two and closes the issue when the PR merges. The trail from "a user reported a bug" to "this exact commit fixed it" is what makes history useful months later.
Draft pull requests. If your work is not ready, open the PR as a draft. It tells reviewers "do not review yet, but you can see the direction". When ready, press "Ready for review".
Releases and tags. A tag names a commit, such as v1.0, and GitHub can turn a tag into a release with notes and downloads. Push a tag with git push origin v1.0.
Writing a README people read
The README.md in the root of the repository is the page GitHub shows under the file list. Hiring managers spend about thirty seconds on it. A strong README for a beginner project has these parts, in this order:
- Title and one sentence saying what the project does.
- A screenshot or a short example of the output.
- How to run it, as numbered steps with the exact commands.
- What you used, a short list of languages and tools.
- What you would improve next, which shows you can think about your own work.
Here is a skeleton to copy:
# Cafe Site

A one-page website for a small cafe, built with plain HTML and CSS.

## Run it

1. Clone the repository.
2. Open index.html in a browser.

## Built with

HTML, CSS

## Next

Add an online menu page and a map.
Markdown headings start with #, and the file displays formatted on GitHub. If you are not sure what a README should say, read the READMEs of well-known open-source projects: the good ones answer "what is this, how do I try it" in the first screen.
A first week on a team: a complete trace
To tie the module together, here is what a realistic first week looks like, command by command. The names are made up.
Monday. Your lead gives you access to the repository shop-site and an issue: "Fix typo in checkout page (#31)".
git clone git@github.com:shop-team/shop-site.git
cd shop-site
git switch -c fix-checkout-typo
You find the typo in checkout.html, fix it, and check what you changed:
git status -s
git diffgit add checkout.html
git commit -m "Fix typo in checkout page heading"
git push -u origin fix-checkout-typoYou open a pull request titled "Fix typo in checkout page heading" with the description "Closes #31". The automated checks run and pass.
Tuesday. A reviewer comments: "Please also fix the same typo in cart.html." You fix it on the same branch:
git add cart.html
git commit -m "Fix typo in cart page heading"
git push
The PR updates itself. The reviewer approves, and you press Squash and merge. GitHub deletes the remote branch.
Wednesday. You clean up and start the next task from the new main:
git switch main
git pull
git branch -D fix-checkout-typo
git switch -c add-contact-link
(Using -D because a squashed branch looks "not merged" to Git, as explained above.)
Thursday. You push a second commit to your branch and Git rejects the push, because a teammate also pushed to it. You run git pull, then git push, exactly as in the rejected-push section.
Friday. Your teammate's change to checkout.html conflicts with yours. You merge main into your branch, resolve the markers, commit, push, and the PR is mergeable again.
Nothing in this week used a command you have not seen. The skill is doing them in the right order without hesitation.
Good habits for a public repository
- Write a README. The
README.mdis the front page. It should say what the project is, how to run it, and a screenshot or example. Employers read it first. - Add a
.gitignorebefore the first commit. - Never push secrets. Not passwords, tokens or
.envfiles. If you do, revoke them immediately: assume they were copied by automated scrapers within minutes. - Commit often, push at least daily. Unpushed work exists only on your laptop.
- Keep
mainworking. If every merge intomainleaves the project runnable, you can always deploy from it. - Pin your best repositories on your profile page and give each a clear description.
Worked examples
Example 1: Upload an existing project. You have a local repo with three commits. You create an empty cafe-site repository on GitHub, copy its URL, then run git remote add origin <url> and git push -u origin main. Result: the three commits appear on GitHub, and git branch -vv shows [origin/main].
Example 2: Check the remote. git remote -v prints the fetch and push URLs. If you see nothing, no remote is configured, and git push fails with fatal: No configured push destination.
Example 3: Clone and contribute. A friend asks you to fix a typo in her project. She adds you as a collaborator. You clone, create fix-typo, commit, push the branch and open a pull request. She approves and merges. You delete the branch.
Example 4: Fetch before deciding. You are unsure whether a teammate pushed. You run git fetch, then git log --oneline main..origin/main, which lists the commits on the remote you have not got yet. Nothing in your working directory changed, so you can decide when to merge.
Example 5: Update a stale PR branch. Your PR shows "This branch is out-of-date with the base branch". Update locally: git switch main, git pull, git switch your-branch, git merge main, resolve any conflicts, then git push. The PR page refreshes.
Example 6: Push a new branch for the first time. git push fails with fatal: The current branch fix-footer-link has no upstream branch. Git even prints the fix: git push --set-upstream origin fix-footer-link. That is the long form of -u.
Example 7: Delete a branch on GitHub and locally. After the merge, the remote branch is gone. git fetch --prune removes stale remote-tracking names, and git branch -vv shows your old branch marked [origin/fix-footer-link: gone]. Delete it locally with git branch -d.
Common mistakes and real error messages
1. Pushing to the wrong place. fatal: 'origin' does not appear to be a git repository followed by fatal: Could not read from remote repository. means the URL in origin is wrong. Fix with git remote set-url origin <correct-url>, and verify with git remote -v.
2. Adding a remote twice. error: remote origin already exists. Use git remote set-url to change it, or git remote remove origin and add it again.
3. Pushing before any commit. error: src refspec main does not match any and error: failed to push some refs. There is no main branch to push yet, because you have not committed. Make a commit first.
4. Wrong credentials. Over HTTPS: remote: Support for password authentication was removed on August 13, 2021. Please use a personal access token instead. (the wording may vary). Over SSH: git@github.com: Permission denied (publickey). For the first, use a token or gh auth login. For the second, check that your public key is added to GitHub and that you ran ssh -T git@github.com.
5. Repository not found. remote: Repository not found. and fatal: repository '...' not found. The spelling is wrong, or the repository is private and you are signed in as the wrong user.
6. Forcing a push. The rejected push is not a bug. Pull first. Use --force only on your own private branch, and prefer --force-with-lease, which refuses if someone else pushed in the meantime.
7. Working on main directly. If your team uses pull requests, a push to main may be blocked by branch protection, a GitHub setting that requires a PR. The error says the branch is protected. Move your commits to a new branch and open a PR.
8. Committing a large generated folder. Pushing node_modules makes the repository huge. Add it to .gitignore. The ignore rule does not help already-committed files, so remove them with git rm -r --cached node_modules and commit.
A debugging walkthrough
Scenario: "git push says everything is up to date, but GitHub shows nothing new."
git status— are there uncommitted changes? "Up to date" only refers to commits. If you edited but never committed, nothing is there to push. Commit first.git branch --show-current— which branch are you on? You may be onmy-branchwhile looking atmainon GitHub. Switch the GitHub page to your branch.git remote -v— isoriginthe repository you are looking at? You may have pushed to a different one.git log --oneline origin/main..HEAD— lists local commits not yet on the remote branch. An empty list means everything was pushed.- Hard refresh the GitHub page. Caches are occasionally the explanation.
The pattern is the same as before: replace guessing with a command that prints the true state.
Interview-style questions
- What is the difference between
git fetchandgit pull? Fetch downloads new commits and updates remote-tracking branches without touching your work. Pull is fetch plus a merge (or rebase) into your current branch. - What is
origin? The default name for the remote you cloned from or pushed to. - Why was my push rejected? The remote has commits you do not have. Pull (and resolve conflicts), then push.
- What is a pull request? A GitHub feature for proposing that one branch be merged into another, with review and discussion.
- What is a fork, and how does it differ from a clone? A fork is a copy of a repository on GitHub under your account. A clone is a copy on your computer. For open source you usually fork, then clone your fork.
- What does
git push --forcedo, and why is it dangerous? It overwrites the remote branch with your version, deleting commits others may have pushed. - Squash merge versus merge commit? Squash collapses all of a branch's commits into one on
main. A merge commit keeps every commit and adds a merge commit.
Practice
1. (Easy) Create a free GitHub account if you do not have one, and create a new empty repository called practice-repo with a README ticked off. What URL does GitHub show?
Solution
It shows an address like https://github.com/yourname/practice-repo.git (HTTPS) and git@github.com:yourname/practice-repo.git (SSH). Leaving the README off keeps the remote empty, so your first push will not be rejected.
2. (Easy) Which command adds a remote named origin, and which one lists the remotes?
Solution
git remote add origin <url> and git remote -v.
3. (Easy) Push your local main to the new repository and make later plain git push work. Which flag does that?
Solution
git push -u origin main. The -u flag records origin/main as the upstream of your local main.
4. (Easy) Explain in your own words the difference between origin and origin/main.
Solution
origin is the name of the remote (the other repository). origin/main is a remote-tracking branch on your computer: your note of where main was on that remote the last time you contacted it.
5. (Medium) Clone your repository into a second folder to pretend to be a teammate. Commit and push from the clone, then in the first copy run git fetch and git status. What do you see?
Solution
git clone <url> teammate-copy
cd teammate-copy
echo teammate > team.txt
git add team.txt
git commit -m "Add team file"
git push
cd ../practice-repo
git fetch
git status
The last command says your branch is behind origin/main by 1 commit and can be fast-forwarded. git pull then brings the file in.
6. (Medium) Now make a commit in each copy without pulling, push one, and push the other. What happens and why?
Solution
The second push is rejected with ! [rejected] main -> main (fetch first). The remote contains a commit the second copy lacks, and accepting the push would lose it. The fix is git pull (then resolve conflicts if any) and git push again.
7. (Medium) Do the full pull-request loop on your own repository: branch add-readme-section, add a line to README.md, push, open the PR, merge it, delete the branch on GitHub and locally.
Solution
git switch -c add-readme-section
echo "## Usage" >> README.md
git add README.md
git commit -m "Add Usage heading to README"
git push -u origin add-readme-section
Open the PR from the banner, press Merge pull request, then delete the branch on GitHub. Locally: git switch main, git pull, git branch -d add-readme-section (use -D only if you squashed and Git claims it is unmerged).
8. (Medium) What is the difference between squash-and-merge and a normal merge commit for a PR with five commits?
Solution
A merge commit keeps all five commits and adds a sixth merge commit. Squash replaces the five with one new commit containing their combined changes. Squash gives a tidy main but loses the individual steps.
9. (Hard) You open a PR and a teammate asks you to change one line. You run git commit and git push. Do you need a new PR? Explain.
Solution
No. A pull request tracks a branch, so new commits pushed to the same branch appear in the same PR automatically and reviews continue there.
10. (Hard) Your PR page says the branch is out of date with main, and a conflict exists in index.html. Write the commands to update and resolve it, and explain what you do in the file.
Solution
git switch main
git pull
git switch your-branch
git merge main
Git reports CONFLICT (content): Merge conflict in index.html. Open the file, find the markers, edit to the correct combined text, remove <<<<<<<, ======= and >>>>>>>, then git add index.html, git commit, and git push. The PR updates and the conflict warning disappears.
11. (Hard) You want to fix a typo in an open-source README. List the steps from the fork to the merged change, and say where the upstream remote fits.
Solution
Fork the project on GitHub, clone your fork, create a branch, fix the typo, commit, push the branch to your fork, and open a pull request against the original project. When maintainers merge it, you are done. upstream is an extra remote pointing at the original project (git remote add upstream <original-url>); you use git fetch upstream and git merge upstream/main to keep your fork's main current before starting your next change.
What you now know
- A remote is another copy of the repository, usually on GitHub;
originis its default name, andorigin/mainis your local note of where it was. - You prove who you are with the GitHub CLI, an HTTPS token, or an SSH key pair (public key shared, private key never).
git push -u origin mainuploads and links the branch;git clonecopies a repository with its history;git fetchlooks,git pullfetches and merges.- A push is rejected when the remote has commits you lack. The fix is to pull, resolve conflicts, and push, never
--force. - The pull request loop: update
main, branch, commit, push, open a PR, review, merge, clean up. - Forks let you propose changes to repositories you do not own;
upstreamkeeps your fork current. - Good habits: README,
.gitignore, small PRs, clear messages, no secrets,mainalways working.